venerdì 30 marzo 2012

GLASS VASES AND WHITE FLOWERS

Buongiorno….. chi di voi non ha mai visto questi fiori?


Nella mia zona se ne vedono tantissimi e crescono numerosissimi da maggio ad agosto e di grandi dimensioni. Non ho mai dato loro molto valore…e sinceraente non so nemmeno come si chiamano…ma devo ricredermi e chiedere venia a madre natura perchè visti in queste foto sono bellissimi…. Se crescono anche dalle vostre parti in estate e vi trovate improvvisamente gente a cena, questa è la soluzione per fare un centrotavola veloce con spesa zero……..


.si possono aggiungere anche degli steli verdi, la semplice erba che cresce sulla riva dei fossi…. io la secco e la uso per impacchettare i regali…..


Good morning ..... those of you who have never seen these flowers?

In my area you see them a lot and growing numbers and from May to August and large. I never gave them much value ... and sinceraente not even know their names ... but I have to think again and ask why apologize to mother nature seen in these photos are beautiful .... If they grow well in your part of summer and you're suddenly a dinner party, this is the fastest way to make a centerpiece with zero expenditures ........


. you can also add the green stems, the simple grass that grows on the banks of ditches .... I dry and use it to wrap gifts.


 se non avete vasi in vetro (impossibile non averli) usate o un brocca per l'acqua o un vecchio innaffiatoio oppure ptrete tagliare i gambi tenendolilunghi un decina di cm per porli poi dentro a deu bicchieri oppure dentro ai vasetti di latta che contengono i piselli...insomma se vi ingeniate un po, con poco farete bella figura.
If you do not have glass vases (can not have them) or use a water jug ​​or an old watering can, or cut the stems ptrete tenendolilunghi a ten inch, then place them inside deu glasses or jars inside the tin containing the peas In short ... if you ingeniate a little, little do with a good impression.


kisses

giovedì 29 marzo 2012

DIY SANIA - PART TWO

Circa tre settimane fa vi ho proposto la prima parte di questo DIY, e devo dire che vi è piaciuto un sacco. Oggi eccovi la seconda parte. Idea carina anche questa magari per la cameretta di un bimba..o anche di un maschietto se ci si appende qualche aereo planino, o qualche mongolfiera,nastri azzurri tortora e chi più ne ha più ne metta…


About three weeks ago .... I have proposed the first part of this DIY, and I must say that I liked a lot. Now here's the second part. Maybe even this cute idea for the bedroom of a child or a boy .. if you hang some planino plane, balloon or something, dove blue ribbons and so on and so forth ...


Se ripartiamo da dove siamo rimasti , dopo aver ricoperto la base per la lampada con dei fili di stoffa, ora avvolgete qualche nastro colorato al quale avrete appeso fiori, CUORI, farfalle bottoni…tutto ciò che preferite.


È un idea adattabile ad ogni preferenza…io la farei con piccole chiavi vintage, monogrammi in legno o in ceramica oppure conchiglie e legnetti per chiama il mare.

cosa ne pensate voi?????
If we start from where we were, having served as the basis for the lamp with wire cloth, now wrap some colored tape to which you have hung flowers, hearts, butterflies buttons ... everything you want.


It is an idea adapted to any preference ... I'd do with a little vintage keys, monograms in wood or ceramic shells and sticks, or to call the sea.

how do you think about?


kisses

mercoledì 28 marzo 2012

DIY- FREE PRINTABLE WEDDING INVITATION

Anche oggi tema MATRIMONIO

Non c’è nulla da fare, io adoro matrimoni. Purtroppo per me non so ancora stata a matrimoni belli e curati come quelli che si vedono in giro per il web, e credo che qui nella mia zona siano ancora tutti molto legati alle vecchie tradizioni dei matrimoni super eleganti. (dicendo questo forse si scateneranno le ire dei miei concittadini che mi seguono….) Io credo invece che il matrimonio vada visto più come una festa che rispecchi gli sposi e tengo a precisare GLI SPOSI e non gli invitati. Perché non sdrammatizzare, alleggerire e ringiovanire un po’ tutto ciò che gira intorno ad un matrimonio… (ovviamente non mi riferisco all’importanza del sacramento e dell’unione che si celebrano in chiesa o in comune)

Ecco perché oggi voglio darvi qualche spunto. Ho trovato queste partecipazioni per matrimoni, molto carine a mio parere, che potete gratuitamente scaricare e stampare dai vari link che trovate sotto ogni immagine…..

In questo modo potrete anche risparmiare un po’, e avrete la soddisfazione di dire orgogliosamente che le avete fatte con le vostre mani….


Even today theme MARRIAGE


There is nothing to do, I love weddings. Unfortunately for me I do not know yet at weddings beautiful and cared for as those seen around the web, and I think that here in my area are all still very close to the old traditions of the super stylish weddings. (saying this maybe you will unleash the wrath of my fellow citizens who are following me ....) but I believe that marriage should be seen more as a celebration that reflects the couple and I wish to state WEDDING and not the guests. Why not lighten, lighten and rejuvenate a little 'everything that revolves around a wedding ... (obviously I'm not referring to the importance of the sacrament and the union that are celebrated in a church or town)


That's why today I want to give you some ideas. I found these investments for weddings, very nice in my opinion, you can download and print for free from various links found under each picture .....


In this way you can even save some, 'and you will have the proud satisfaction of saying that you made ​​with your hands ....


free printable wedding invitation from: RUFFLED


free printable wedding invitation from DO IT YOURSELF


free printable wedding invitation  from :WEDDING CHICKS


free printable wedding invitation from :WEDDING CHICKS


PROVATE A FARLE!!!!!

TRY TO DO THEM!!!!!

KISSES

martedì 27 marzo 2012

LAVENDER WEDDING


AHHHHH...se solo ci si potesse sposare ad ogni anniversario....è stato così emozionante e indimenticabile che vorrei poterlo ripetere ogni anno...

Se fosse così allora potremmo cambiare location e colori ogni volta. La lavanda è una delle piante che preferisco di più ( e credo di averlo già scritto altre volte...).
questo matrimonio risulta così delicato dolce e romantico da far venire i brividi.....
gli sposi sembrano quasi intimiditi.....

Ahhhh ... if only we could marry in every anniversary .... it was so exciting and unforgettable experience that I wish I could repeat every year ...


If it were so then we could change the location and color every time. Lavender is one of the plants that prefer more (and I believe I have already written at other times ...).
this marriage is so delicate and sweet romantic from nightmares .....
the couple seem intimidated .....


i tavoli..semplici e raffinati circondati da campi di lavanda....quanto profumo!!!!!

tables decoration.... simple and elegant, surrounded by fields of lavender.... what fragance!!!!!


chicca.... la pittrice!!!!!! un quadro creato quel giorno, un ricordo  megliore di una foto....

gem .... the painter!! created a framework that day, a memory best of  a photo ....


il bouquet nei toni del lavanda e lilla intenso.... sembrano fiori colti al momento...

the bouquet in shades of lavender and deep purple .... seem to flowers picked at the time ...


dettagli vintage....

vintage details.....


c'è anche la corona di fiorni per la principessa....

ther is also the flower crown for the princess ...


lavanda lavanda e lavanda...

lavender lavender and lavender....


E' tutto cosi incantevole!!!! ..anche il nastro lilla per il cagnolino....

It 's all so lovely!! Also .. the purple ribbon for the dog ....


kisses

lunedì 26 marzo 2012

SUGAR HEARTS - DIY


Care amiche mie…buongiorno. Sono fiera di vedervi aumentare sempre di più….. è bello vedere che il proprio lavoro da i suoi frutti, anche se i frutti non sono economici….bensì soddisfazione personale.

Oggi un “do it yourself” davvero carino.. CUORI DI ZUCCHERO. Dovrei sperimentarli tutti i DIY che vi propongo ma faccio senza specificare che è impossibile per questione di tempo, questo però mi piacerebbe proprio farlo…..

Vi elenco il materiale necessario:

4 cucchiaini da tè (o più) di albume d'uovo
colorante alimentare
Tagliere grande,o teglia rivestita di carta forno
Formina biscotti piccoli
Ciotole piccole e medie, spatole, mattarello, misurini, burro, coltello
sacchetti, nastri colorati per il confezionamento


Hello ... my dear friends. I am proud to see you increase more and more ..... it is nice to see that your work has its rewards, even if the fruits are not cheap .... but personal satisfaction.

Today a "do it yourself" really cute .. HEARTS OF SUGAR. Should I try them all that I propose, but I do DIY without specifying that it is impossible for a matter of time, but I'd like to do this .....

We list the materials you need:

4 teaspoons (or more) of egg white
food coloring
Large cutting board or baking sheet lined with parchment paper
Small biscuit cutter
Small and medium-sized bowls, spatulas, rolling pin, measuring spoons, butter knife
bags, colored ribbons for packaging


RICETTA ORIGINALE :  Erica O’Brien Cake Design
IMMAGINI:  Brooke Allison Photography

Fase 1.


Versa ½ tazza di zucchero in una ciotola media. Aggiungere una piccola quantità di colorante alimentare e mescolare accuratamente. Questo sarà il colore più scuro. (Suggerimento: Un po di colore andrà perso, ne verrà viene aggiunto nel passaggio successivo.) Aggiungerne, se necessario, fino a quando si ottiene il colore desiderato. Aggiungere 1 cucchiaino di bianco d'uovo o liquido meringa e mescolare bene finchè il composto assomiglia sabbia bagnata. Fare attenzione a non aggiungere troppo liquido o si sciogliere lo zucchero.


Passo 2.

vuota il composto sulla teglia rivestita di carta da forno. Stendere con la mano o spatola, poi comprimere con il mattarello per appiattire la miscela che dovrebbe essere il più compatto possibile e livello, circa 1 cm.Con la formina per biscotti tagliate i cuori nel foglio di zucchero, metteteli sulla teglia rivestita di carta da forno. Se la taglierina non rilascerà il cuore, picchiettare delicatamente con il dorso di un coltello da burro. Ripetete 10-20 volte (o secondo quanti cuori di quel colore volete fare). Se il cuore non terrà la loro forma, aggiungere il bianco d'uovo, piccole quantità, e mescolare accuratamente. Se lo zucchero si accumula nel cutter (formina per biscotti), sciacquare con acqua tiepida e asciugare prima di continuare. Versare il rimanente composto colorato in una ciotola lo zucchero e passare al punto 3.


Passo 3.

Aggiungere ½ tazza di zucchero allo zucchero colorato dal passo 2 per schiarirlo. Mescolare accuratamente. Aggiungere 1 cucchiaino di bianco d'uovo. Se il colore non viene raggiunto, continuare ad aggiungere ulteriori ½ tazza di zucchero e 1 cucchiaino di bianco d’uovo e mescolando bene fino a quando il colore desiderato si è ottenuto . Ripetere il passaggio 2. Continuare con i passi 2 e 3 fino a tonalità desiderata e il numero di cuori di zucchero che si vogliono fare . Si consiglia almeno tre a cinque colori. Lo zucchero rimanente può essere conservato in sacchi ziplock per uso futuro.


Fase 4.

Scaldare il forno a 200 gradi. Cuocere i cuori per 10 minuti. Lasciar indurire durante la notte. I cuori di zucchero saranno della consistenza di zollette di zucchero.


OROGINAL RECEIPT: Erica O’Brien Cake Design
PICTURE : Erica O’Brien Cake Design

Step 1.


Place ½ cup sugar in medium bowl. Add a small amount of paste food coloring (we used a combination of Wilton’s Rose and Violet), and mix thoroughly. This will be your darkest color. (Hint: A little goes a long way and will darken once liquid is added in next step.) Add more if needed until desired color is achieved. Add 1 teaspoon egg white or meringue liquid and mix thoroughly until the mixture resembles wet sand. Be careful not to add too much liquid or you will dissolve the sugar.


Step 2.


Empty contents onto Silpat or parchment lined cutting board or baking sheet. Spread with hand or spatula and pat down, then roll over mixture with rolling pin to compress. Ideally, the flattened mixture should be as compact as possible and level, about ¼”. Press heart cutter into mixture and lift up. Place hearts on lined baking sheet. If cutter will not release heart, gently tap with the back of a butter knife. Repeat 10-20 times or as many as desired. If hearts will not hold their shape, add more egg white or meringue liquid in small increments and mix thoroughly. If sugar builds up in cutter, rinse with warm water and pat dry before continuing. Pour remaining colored sugar back into bowl and proceed to Step 3.


Step 3.


Add ½ cup sugar to colored sugar from Step 2 to lighten. Mix thoroughly. Add 1 teaspoon egg white or liquid meringue. If desired color is not achieved, continue adding additional ½ cup sugar plus 1 teaspoon egg white or liquid meringue and mixing thoroughly until desired color is achieved. Repeat Step 2. Continue with Steps 2 and 3 until desired shades and number of sugar hearts are achieved. We recommend at least three to five shades. Leftover sugar can be stored in ziplock bags for future use.


Step 4.


Heat oven to 200 degrees. Heat hearts in oven for 10 minutes. Allow to harden overnight. Sugar hearts will be the consistency of sugar cubes.


Sembra facile leggendo la ricetta…ma non ne sono così sicura, Sono sicura però che il risultato è veramente carino….

It seems easy to read the recipe ... but I'm not so sure, but I'm sure that the result is pretty cool ....


venerdì 23 marzo 2012

DIY- SILK FLOWER WEDDING

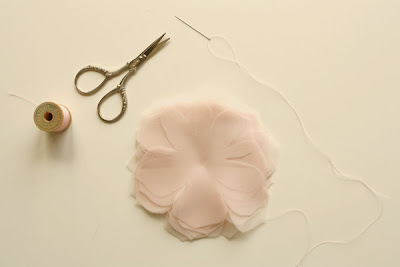
Spose di primavera……. Avete voglia di qualcosa di unico e speciale fatto con le vostre manine????? Ecco un progetto per un fiore in seta….. Trovo sia semplice e di gran effetto.

Con un vestito stile impero, morbido, per una sposa con i capelli lunghi raccolti sul fianco, questo fiore è il tocco di classe…provate a farlo!!!!!!e magari mandatemi le foto….


Brides of Spring ....... You want something unique and special done with your hands??? Here's a project for a silk flower ..... Am is simple and of great effect.

With an empire style dress, soft, for a bride with long hair on the side, this flower is a touch of class ... try it!! And maybe send me pictures ....


START:


Scegliete uno scampolo di seta del colore desiderato. Disegnate su un cartoncino la sagoma del fiore, ritagliatelo e usatelo per tagliare più starti di stoffa assieme. In questo modo guadagnare tempo e avrete già pronti gli strati del fiore. (per fare in modo che la stoffa non vi scivoli tra le mani, puntate gli strati con gi spilli )

Choose a scrap of silk color you want. Drawn on a cardboard the shape of the flower, cut it out and use it to cut multiple layers of fabric together. In this way you will save time and ready the layers of the flower. (to ensure that the fabric will not slip between the hands, bets the layers with Th pins)


project wedding

Sfalsate gli strati di stoffa fra di loro e fermateli con  ago e filo. Se volete che il fiore sia più grosso, preparate altri petali e uniteli agli altri come se fossero due fiori uno vicino all’altro.

Staggered layers of fabric between them and stop them with a needle and thread. If you want the flower is bigger, more prepared petals and add them to others as if they were two flowers next to each other


 Per impreziosire il fiore cucite delle perline nel centro….

.To embellish the flower beads sewn in the center ....


BUON LAVORO

GOOD WORK


giovedì 22 marzo 2012

WINTER INTO SPRING OUTFIT

....RAGAZZE....il bianco e il nero sono intramontabili..... oggi per voi un outfit per la mezza stagione. In questi giorni le temperature sono già miti ma non siposso ancora lasciare le maniche lunghe.
Un bel giubbino in pelle nero, con una preziosa canotta bianca un paio di jeans , stivali neri sono perfetti per un aperitivo serale con le amiche. La canotta bianca è il pezzo che preferisco di questo outfit....


Winter into Spring


GIRLS .... .... the white and black are intamontabili ..... an outfit for you today for midseason. These days the temperatures are mild but have not yet siposso leave the sleeves.
A beautiful black leather jacket, a white tank top with a valuable pair of jeans, boots, blacks are perfect for an evening drink with friends. The white tank is my favorite piece of this outfit ....

mercoledì 21 marzo 2012

BAKER TWINE - DIY

Ragazze l’età si fa sentire e preparo i post poi li pubblico senza parole ma soprattutto senza accorgemene!! Sono messa bene….Volevo proporvelo più avanti questo stupendo diy per il baker twine…. Ma è andata cosi e vedo anche che vi piace un sacco…. Allora ci provo pure io…si si…….

houseofearnest diy


Girls age makes itself felt and then post them to prepare the audience speechless, but especially without realizing it! They are made ​​well .... I wanted to propose it later for this wonderful baker diy twine .... But it went so well and I see you like a lot .... Then I try ... well I will be .......

EASTER INSPIRATION

Care amiche mie, mancano poco più di due settimane alla Paqua. Quest’anno vorrei fare qualche decorazione in casa e anche qualche pensierino da regalare. Oggi vi mostro qualche immagine dalla quale prendere spunto. I colori che prediligo , il rosa e l’azzurro, sono primaverili delicati e adatti a grandi e piccoli.

My dear friends, missing just over two weeks to easter. This year I would like to do some decorating in the house and some little thought to give. Today I show you some pictures from which to get ideas. The colors you prefer, pink and blue, spring is mild and suitable for large and small.


all pictures from pinterest

i cupcakes a forma di coniglio...

rubbit capcakes


un idea per il bigliettino di auguri

an idea for the wishes


Il coniglio di lino è meraviglioso!!!!! Da fare assolutamente….
Buona giornata !!!!
N.B: voglio rassicurare le vincitrici del giveaway che non ho scordato di spedire i loro premi..... purtroppo no sono proprio riuscita....prometto che netro fine settimana spedisco il tutto...grazie infinite della pazienza!!!!!


The rabbit Flax is wonderful!! Have to do it ....
Nice day!
NB: I want to reassure the winners of the giveaway that I haven't forgot to send their prizes ..... unfortunately I just could not promise that by the weekend .... I send it all ... thank you so much patience!!

Related Posts Plugin for WordPress, Blogger...